Where to Find Breyer This Holiday Season
A guide to nearly 100 physical retailers across 39 states!

Want to bring a little more magic to your Breyer Mane Beauty styling head? Join expert equine artist Rayvin Maddock as she transforms a simple horse into a dazzling custom unicorn to style to your heart's content!
|
Supply list:
|
|
Follow Rayvin's sculpting video tutorial below to help bring your creation to life, and continue on with her additional written instructions for the final steps!
The plastic of the Mane Beauty styling heads is a little more flexible than most Breyer models, so it is best to support it a bit more from the inside. This helps prevent the epoxy from cracking and helps it bond to the model better.
Remove the Mane Beauty from the base and cut a hole in the bottom of the neck where it meets the base with your hobby knife. Fill the hole with tin foil to help support the flexible plastic and provide stability for the epoxy we will use later. I used the end of a paintbrush to push the tin foil inside and packed it in pretty tight, until it was firm when I pushed on the Mane Beauty head from all angles.

Cutting a hole at the bottom of the Mane Beauty head to fill with tin foil
Using a hobby knife, cut a hole in the forehead for a horn (if you want your Mane Beauty to become a unicorn, that is!) For my styling head, I used the handle of an old paintbrush as the base to sculpt my horn on. This was secured with epoxy putty (see step 5 for details!)
 |
 |
 |
Using the handle of an old paintbrush to create the base for the unicorn horn
Use a coarse grit sandpaper to roughen up any areas of the head that you want to add epoxy to. This will help the epoxy to have something to stick to securely when you start sculpting.
Wash your styling head’s plastic surface with Comet or Ajax and water. It can help to tie the mane up and out of the way while you do this. After washing, let it air-dry, or wipe dry. Washing the styling head assures that no loose dirt or debris will get in the way of your painting and sculpting later.
Using a two-part epoxy putty like Magic Sculpt or Aves Apoxie Sculpt, mix the two parts 50/50 by size, using gloves when mixing if possible. To measure them 50/50, I make two balls of each part and compare the size visually.
Did you know? If you mix too much epoxy, you can actually freeze it and use it later! So don’t worry too much if you make too much or don’t put it on your styling head fast enough. Just freeze it before it gets too hard and you’re golden! Neat trick, huh?
Lay in your shapes and smooth them into the plastic with water and your finger, just like you would for a normal custom model horse. For shapes like eyelashes that need a bit more support, it’s easier to leave these parts until your epoxy is a little firmer, which will happen as it starts to harden while you work with it. It blends in better with the plastic When it is freshly-mixed, so use your first few minutes to do the parts that need blending in first.

Details added with epoxy putty, including a more detailed facial structure
and decorative filigree around the horn and neck
For fine detailing, such as around the eyes, I use silicone-tipped tools called Color Shapers. You can get non-name brands ones off of websites like Amazon or eBay. Use water to lubricate the tool and smooth your epoxy.
For blending and smoothing of details, you can also use a cheap, soft, and disposable brush. Wet it slightly with water (not dripping wet) and with a little pressure, you can blend out any tool marks you may have made.
Once your epoxy is complete, let it dry overnight. Sand any imperfections with a fine grit sandpaper. Before any primer or paint is applied, make sure to tape off the mane edges with a low-tack tape such as blue painter's tape. The rest of the hair can be braided, tied up, and bagged in plastic to keep it clean and out of the way while you paint.
Now it’s time to prime! With a softer plastic it is best to use a Latex primer or a Gesso instead of aerosols, as they can get sticky. Gesso can be applied in thin coats and hand-painted on.
 |
 |
Styling head primed with the hair protected
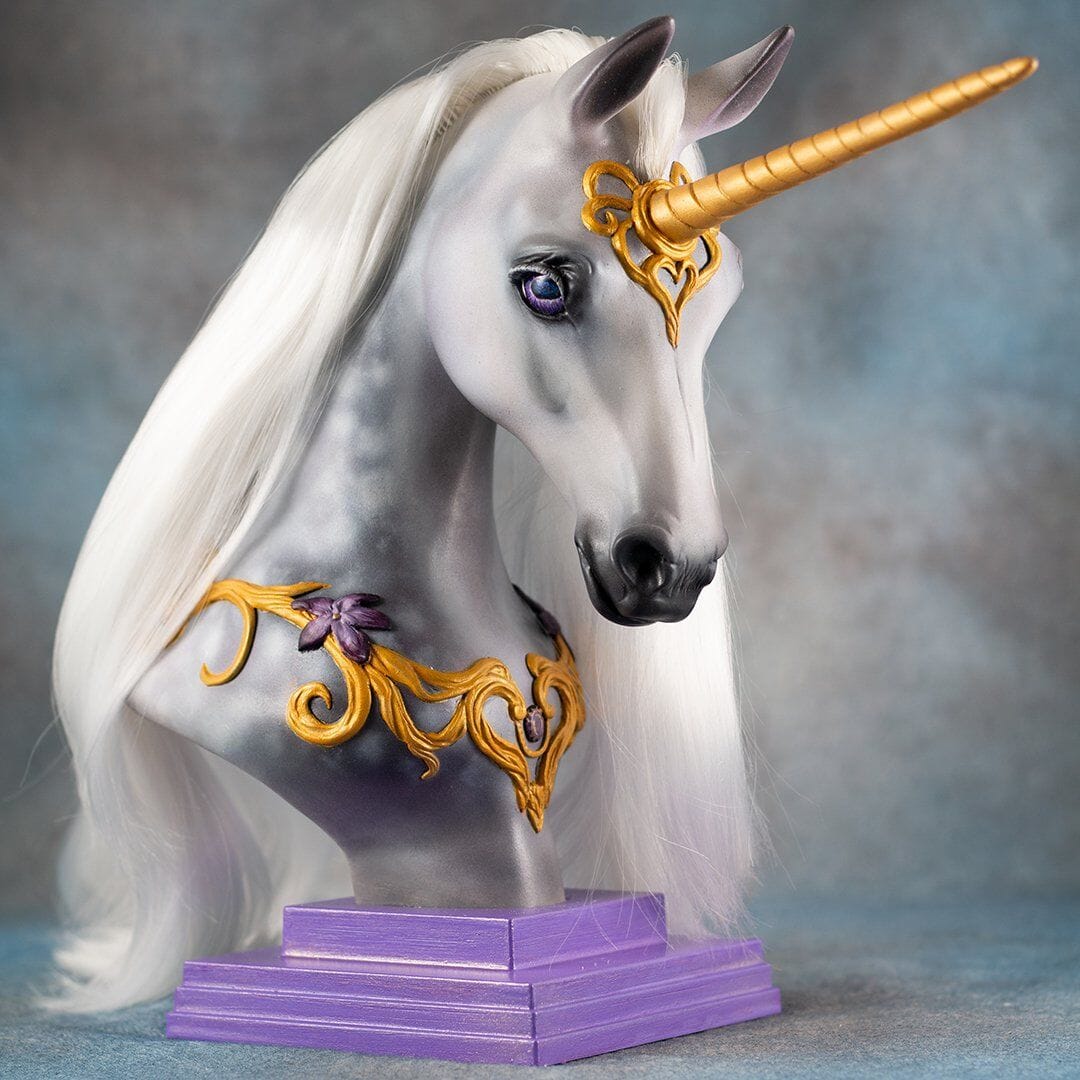
Using your painting medium of choice, add color to your Mane Beauty just how you would like her! Here I am using an airbrush with acrylic metallic purples, white pearls and some blues and greys to achieve a funky purple misty dapple grey. The eyes were then hand-painted in acrylics. I also painted the base purple, to match her eyes and purple flowers.
 |
 |
 |
Once your color is complete, you can seal the deal with your favorite sealer. I prefer Winsor & Newton Aerosol Satin Varnish for a nice "show sheen" look. I use 2-3 layers, letting them dry fully between each. Finish off the eyes with pouring medium or brush-on gloss for that realistic shine!
Once your sealer has dried, remove your painters tape, plastic and let the long flowing locks cascade down. Style away with your very unique and magical creation!

 |
 |
 |
The finished product!

A guide to nearly 100 physical retailers across 39 states!

A collection of exclusive models is now arriving at Tractor Supply stores just in time for the holiday season!

We're making room for exciting new 2026 additions!
