Where to Find Breyer This Holiday Season
A guide to nearly 100 physical retailers across 39 states!

Sometimes, especially when purchasing vintage Breyer models, you may come across a horse that is missing an entire limb that has long since disappeared. However, that doesn't mean the model's only option is the body box for customizing - it's possible to cast a new leg (or any broken piece, for that matter) in resin and restore your model to its former glory!
In this tutorial, we will be making a simple two-part mold to create a new leg for this vintage Quarter Horse Yearling model.
|
Supplies:
|
 |
 |
| Supports and pour hole added |
The first step is to stand the horse on cardboard and make a brace for the broken leg using non-drying clay, such as Chavant. Because the Quarter Horse Yearling mold is standing square, we are able to cast another one of her legs to replace the one that is missing. However, if you are missing the leg from a more dynamic sculpture, you will need to cast the missing piece from a different model on the same mold.
Place a few wads of clay around the other hooves as well to hold the horse securely in place. Then place a cylindrical shape under the hoof you will be casting. This extra wad will serve as a “pour hole" later.
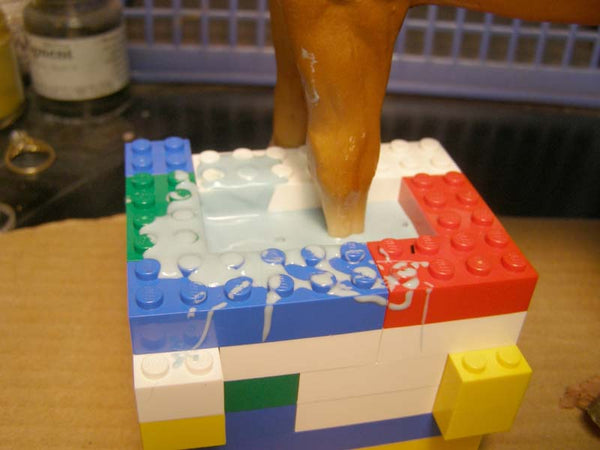
Lesli Kathman of Blackberry Lane Studios introduced me to the use of LEGO bricks as a mold-making material, and every time I use these blocks, I have a successful casting session. Slowly start to build a rectangular shape around the leg that will be casted in resin using the LEGO bricks.
Continue building up the blocks until they reach the area above the break. Then, swab a thin coat of Murphy’s Oil soap or Vaseline on the inside of the mold and leg. This will keep the liquid rubber from sticking to the box and leg.
 |
 |
|
Create a mold around the leg to be casted using the bricks. Make sure the mold is tall enough for the break. |
Murphy's Oil Soap or Vaseline will prevent the liquid rubber from sticking to your new mold and your model. |
There are many different liquid rubbers on the market. I have used a few and found OOMOO 25 liquid rubber compound by Smooth-On to be extremely easy to use because it’s used in a 1:1 ratio and dries within 75 minutes.
Take two paper cups and pour liquid from the OOMOO 25 Part A into one cup, and the same amount of liquid rubber from Part B into the second cup. Using paper cups will allow you to see through the cups and eyeball your 1:1 measurements. Pour one cup of liquid in the other and stir until it is thoroughly mixed. This should take about a minute.
Slowly pour the mixed rubber into the mold box. Pour from one of the corners. Let the mold sit and cure for the recommended amount of time. I normally wait a day.
 |
 |
| Pour the liquid rubber from the corner of mold. |
Make sure to give the liquid rubber plenty of time to cure in the mold. |
Break apart the mold box to reveal a block of cured rubber around your horse’s leg. Carefully cut the sides of the rubber block with a sharp hobby knife - avoid cutting the model inside the mold. Pull the mold apart to see the negative impression of a hoof and leg.
 |
 |
 |
| Disassemble the blocks. | The cured rubber mold. | Mold cut in half to reveal impression. |
Put the two mold pieces back together, and bind them securely with a rubber band. Make sure the pour hole is facing up. If there are any holes on the other end of your mold, plug it up with some of your clay.
Mix your liquid polyurethane casting resin according to manufacturer’s directions. Pour it into the mold through the pour hole and let the resin fully cure for the recommended time.
After the new resin leg has cured, take it out of the mold and remove the extra resin created by the pour hole. Attach the casting to the model's broken leg using Zap-A-Gap or Crazy Glue. Be sure to glue around the entire leg break. To make this glue harden instantly, sprinkle a tiny bit of baking soda onto it. This creates a secure bond between the new resin leg and the Breyer model's cellulose acetate plastic.
 |
 |
 |
| Mold securely closed and ready for resin. |
Cured resin in mold. | Glue new resin leg to break and sprinkle baking soda. |
To further strengthen the leg, apply a small amount of Aves Apoxie Sculpt around the entire breaking point and smooth it out to create a seamless transition between resin repair and plastic. Let this epoxy dry for 24 hours.
Prime only the epoxied areas, and then touch up the broken area with acrylic paint. For this horse, I left the natural color of the resin unpainted where the sock would lie. I felt the natural look of the resin matched the look of the Breyer unpainted plastic socks perfectly.
 |
 |
 |
| Epoxied leg ready for paint. | Close-up of the new leg. | The finished repair. Looking good! |
To learn more about Jennifer and her artwork, please visit www.jenndanza.com!

A guide to nearly 100 physical retailers across 39 states!

A collection of exclusive models is now arriving at Tractor Supply stores just in time for the holiday season!

We're making room for exciting new 2026 additions!
