Where to Find Breyer This Holiday Season
A guide to nearly 100 physical retailers across 39 states!


After barrel racing, pole bending is perhaps the next most popular patterned racing event. In pole bending, six upright poles are placed 21’ apart in a line. Don’t make the error of sticking your poles into the ground; they must be mounted in bases and be free standing.
In the old days, metal brake drums were popular pole bases. They were inexpensive, durable, and heavy enough to act as stable bases for upright wooden poles. However, imagine a rider falling into one these and you’ll understand why they pose a safety hazard! Today, much safer heavy rubber bases are the norm, with a 6’ length of PVC pipe inserted.
When it comes to model poles, a stable base is a necessity. You don’t want it to topple over in a breeze when taking outdoor photos or when someone walks by at a live show. Therefore, the base needs weight. There are wooden discs available in craft stores that can be used. For a DIY solution, make your own using caps from milk jugs!
Start by placing a cap with the open side down on a cutting board. Using a paring knife, poke into the center and cut out a small hole. The hole should be a tad smaller than the diameter of pole to be inserted.

Dowels should be approximately ¼” diameter. Measure and cut 9” long for Traditional models or 7” long for Classics. Lightly sand the ends. Push a pole all the way into each base, so that the pole bottom touches the table and is even with the bottom of the cap. Try to get the pole to stand as straight as possible by twisting it or pushing it gently to one side or the other.

Next, you’ll need some kind of rack in which to stand the poles upside down. I use an old piece of Styrofoam packaging material, but an upside down shoebox can do the trick. Make small holes in the rack. Now, turn over the pole and insert it into a hole in the rack. The empty cap should face up. Stand all of your poles in the rack before continuing.
Mix up some Plaster of Paris. It takes approximately one heaping teaspoon of powder for each base to be filled. Add water little by little, until the desired consistency is achieved (fairly thick, but not lumpy). Carefully spoon the plaster into each base. It should be level with the cap edge and the pole end. Leave them to dry.
 
|
 |
Check them after an hour or so. If the plaster has set, lay a pole on the side of its base on the cutting board. Use the paring knife to shave away any excess plaster and make the bottom flat. This is also an opportunity to help make the pole stand straighter by shaving more of less to compensate. Don’t wait too long for this step as it’s difficult to shave away hard, dry plaster.

It’s a good idea to lay the poles down for a few days to allow all the moisture to dry out of the plaster. If left upright, they can leave damp or moldy marks on the surface on which they were standing.
To avoid brush marks, use black spray paint on the bases. Spray in a well-ventilated area and put down plenty of newspapers to catch any drift. Apply two light coats, rather than a single heavy one. Let dry completely.
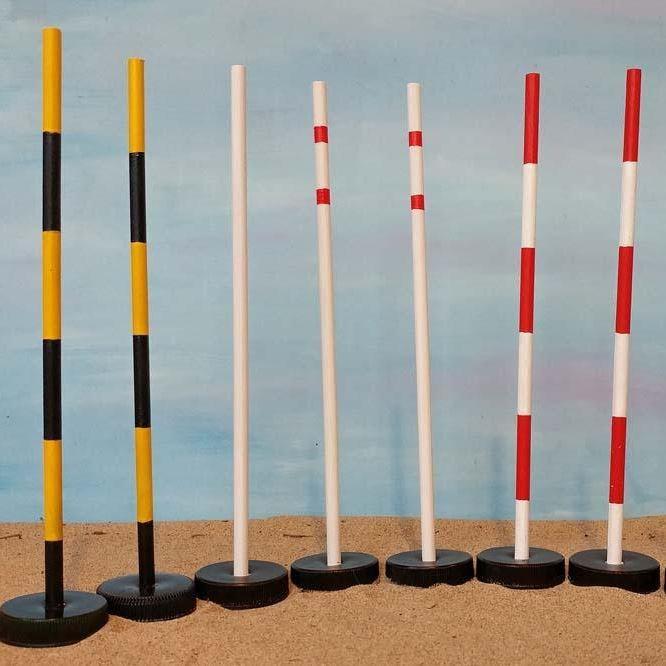
Now you can paint the dowel with acrylic paint. Association rules vary on color requirements. National Pole Bending Association, for example, prefers white poles, but allows rings of red or blue on them. Western Horsemen of Oregon requires a 3” stripe one foot from the top, and another 3” stripe one foot below the first one. However, pole bending photos on the internet show many color schemes and stripe patterns, as well as solid white.
 |
| Completed Traditional and Classics-scale poles painted in different ways. |
Besides the well-known pole bending event, upright poles are also used in figure 8 race, BiRangle, key race, and various other stake races. Poles can also mark start/finish lines in a number of timed events.
A fun gymkhana event is musical hats, where hats are hung from poles arranged in a large circle. Contestants ride around the perimeter as the music plays. Once the music stops, everyone has to get to a pole and grab a hat without turning back. Of course, there’s always one less hat than number of riders.
In addition to gymkhana, upright poles can be used as trail obstacles. Hang a slicker on one and have the rider pick up and carry (or wear) the slicker to a second pole. Trot or lope a serpentine around poles. In-hand trail entries could also trot a serpentine around poles.
By doing a little research, looking at pictures of real horse events, and using a bit of imagination, you’ll find many ways to use your new poles!

A guide to nearly 100 physical retailers across 39 states!

A collection of exclusive models is now arriving at Tractor Supply stores just in time for the holiday season!

We're making room for exciting new 2026 additions!
